TypeScript quickstart
In this quick start guide, we will write our first script in TypeScript. Windmill uses Bun, Nodejs and Deno as the available TypeScript runtimes.
This tutorial covers how to create a simple "Hello World" script in TypeScript through Windmill web IDE, with the standard mode of handling dependencies in TypeScript (Lockfile per script inferred from imports). See the dedicated pages to develop scripts locally and other methods of handling dependencies in TypeScript.
Scripts are the basic building blocks in Windmill. They can be run and scheduled as standalone, chained together to create Flows or displayed with a personalized User Interface as Apps.
Scripts consist of 2 parts:
- Code: for TypeScript scripts, it must have at least a main function.
- Settings: settings & metadata about the Script such as its path, summary, description, JSON Schema of its inputs (inferred from its signature).
When stored in a code repository, those 2 parts are stored separately at <path>.ts and <path>.script.yaml.
This is a simple example of a script built in TypeScript with Windmill:
import { WebClient } from '@slack/web-api';

type Slack = {
	token: string;
};

export async function main(slack: Slack, channel: string, message: string): Promise<void> {
	// Initialize the Slack WebClient with the token from the Slack resource
	const web = new WebClient(slack.token);

	// Use the chat.postMessage method from the Slack WebClient to send a message
	await web.chat.postMessage({
		channel: channel,
		text: message
	});
}
In this quick start guide, we'll create a script that greets the operator running it.
From the Home page, click +Script. This will take you to the first step of script creation: Metadata.
Settings

As part of the settings menu, each script has metadata associated with it, enabling it to be defined and configured in depth.
- Summary (optional) is a short, human-readable summary of the Script. It will be displayed as a title across Windmill. If omitted, the UI will use the
pathby default. - Path is the Script's unique identifier that consists of the script's owner, and the script's name. The owner can be either a user, or a group (folder).
- Description is where you can give instructions through the auto-generated UI to users on how to run your Script. It supports markdown.
- Language of the script.
- Script kind: Action (by default), Trigger, Approval, Error handler or Preprocessor. This acts as a tag to filter appropriate scripts from the flow editor.
This menu also has additional settings on Runtime, Generated UI and Triggers.
Now click on the code editor on the left side.
Code
Windmill provides an online editor to work on your Scripts. The left-side is the editor itself. The right-side previews the UI that Windmill will generate from the Script's signature - this will be visible to the users of the Script. You can preview that UI, provide input values, and test your script there.

There are two options for runtimes in TypeScript:
As we picked TypeScript (Bun) for this example, Windmill provided some TypeScript boilerplate. Let's take a look:
// there are multiple modes to add as header: //nobundling //native //npm //nodejs
// https://www.windmill.dev/docs/getting_started/scripts_quickstart/typescript#modes

// import { toWords } from "number-to-words@1"
import * as wmill from "windmill-client"

// fill the type, or use the +Resource type to get a type-safe reference to a resource
// type Postgresql = object


export async function main(
  a: number,
  b: "my" | "enum",
  //c: Postgresql,
  //d: wmill.S3Object, // https://www.windmill.dev/docs/core_concepts/persistent_storage/large_data_files
  //d: DynSelect_foo, // https://www.windmill.dev/docs/core_concepts/json_schema_and_parsing#dynamic-select
  e = "inferred type string from default arg",
  f = { nested: "object" },
  g: {
    label: "Variant 1",
    foo: string
  } | {
    label: "Variant 2",
    bar: number
  }
) {
  // let x = await wmill.getVariable('u/user/foo')
  return { foo: a };
}
In Windmill, scripts need to have a main function that will be the script's
entrypoint. There are a few important things to note about the main.
- The main arguments are used for generating
- the input spec of the Script
- the frontend that you see when running the Script as a standalone app.
- Type annotations are used to generate the UI form, and help pre-validate inputs. While not mandatory, they are highly recommended. You can customize the UI in later steps (but not change the input type!).
Also take a look at the import statement lines that are commented out. In TypeScript, dependencies and their versions are contained in the script and hence there is no need for any additional steps. The TypeScript runtime is Bun, which is 100% compatible with Node.js without any code modifications. You can use npm imports directly in Windmill. The last import line imports the Windmill client, that is needed for example, to access variables or resources. We won't go into that here.
Back to our "Hello World". We can clear up unused import statements, change the
main to take in the user's name. Let's also return the name, maybe we can use
this later if we use this Script within a flow or app and need to pass its result on.
export async function main(name: string) {
	console.log("Hello world! Oh, it's you %s? Greetings!", name);
	return { name };
}
Modes
Pre-bundling and nobundling�
Windmill pre-bundles your script at deployment time using Bun bundler. This improve memory usage and speed up the execution time of your script. If you would like to disable this feature, you can add the following comment at the top of your script:
//nobundling
Native
Windmill provides a runtime that is more lightweight but supports less features and allow to run scripts in a more lightweight manner with direct bindings to v8. To enable, you can add the following comment at the top of your script:
//native
To learn more, see Rest scripts, that are under the hood Bun TypeScripts with a //native header.
NodeJS
Windmill provides a true NodeJS compatibility mode. This means that you can run your existing NodeJS code without any modifications.
The only thing you need to do is to select TypeScript (Bun) as the runtime and as the first line, use:
//nodejs

This method is an escape hatch for using another runtime (NodeJS), but it is slower than Deno and Bun since it resorts to Bun under the hood.
This feature is exclusive to Cloud plans and Self-Hosted Enterprise edition.
Npm
Similarly, you can use npm install instead of bun install to install dependencies. This is useful as an escape hatch for cases not supported by bun:
//npm
This is also exclusive to Cloud plans and Self-Hosted Enterprise edition.
Deno
As we picked TypeScript (Deno) for this example, Windmill provided some TypeScript boilerplate. Let's take a look:
// Ctrl/CMD+. to cache dependencies on imports hover.

// Deno uses "npm:" prefix to import from npm (https://deno.land/manual@v1.36.3/node/npm_specifiers)
// import * as wmill from "npm:windmill-client@1.525.0"

// fill the type, or use the +Resource type to get a type-safe reference to a resource
// type Postgresql = object

export async function main(
  a: number,
  b: "my" | "enum",
  //c: Postgresql,
  d = "inferred type string from default arg",
  e = { nested: "object" },
  //e: wmill.Base64
) {
  // let x = await wmill.getVariable('u/user/foo')
  return { foo: a };
}
In Windmill, scripts need to have a main function that will be the script's
entrypoint. There are a few important things to note about the main.
- The main arguments are used for generating
- the input spec of the Script
- the frontend that you see when running the Script as a standalone app.
- Type annotations are used to generate the UI form, and help pre-validate inputs. While not mandatory, they are highly recommended. You can customize the UI in later steps (but not change the input type!).
Also take a look at the import statement lines that are commented out. In TypeScript, dependencies and their versions are contained in the script and hence there is no need for any additional steps. The resolution is done by Deno. You can use npm imports directly in Windmill. The last import line imports the Windmill client, that is needed for example, to access variables or resources. We won't go into that here.
Back to our "Hello World". We can clear up unused import statements, change the
main to take in the user's name. Let's also return the name, maybe we can use
this later if we use this Script within a flow or app and need to pass its result on.
export async function main(name: string) {
	console.log("Hello world! Oh, it's you %s? Greetings!", name);
	return { name };
}
Instant preview & testing
Look at the UI preview on the right: it was updated to match the input
signature. Run a test (Ctrl + Enter) to verify everything works.
You can change how the UI behaves by changing the main signature. For example, if you add a default for the name argument, the UI won't consider this field as required anymore.
main(name: string = "you")
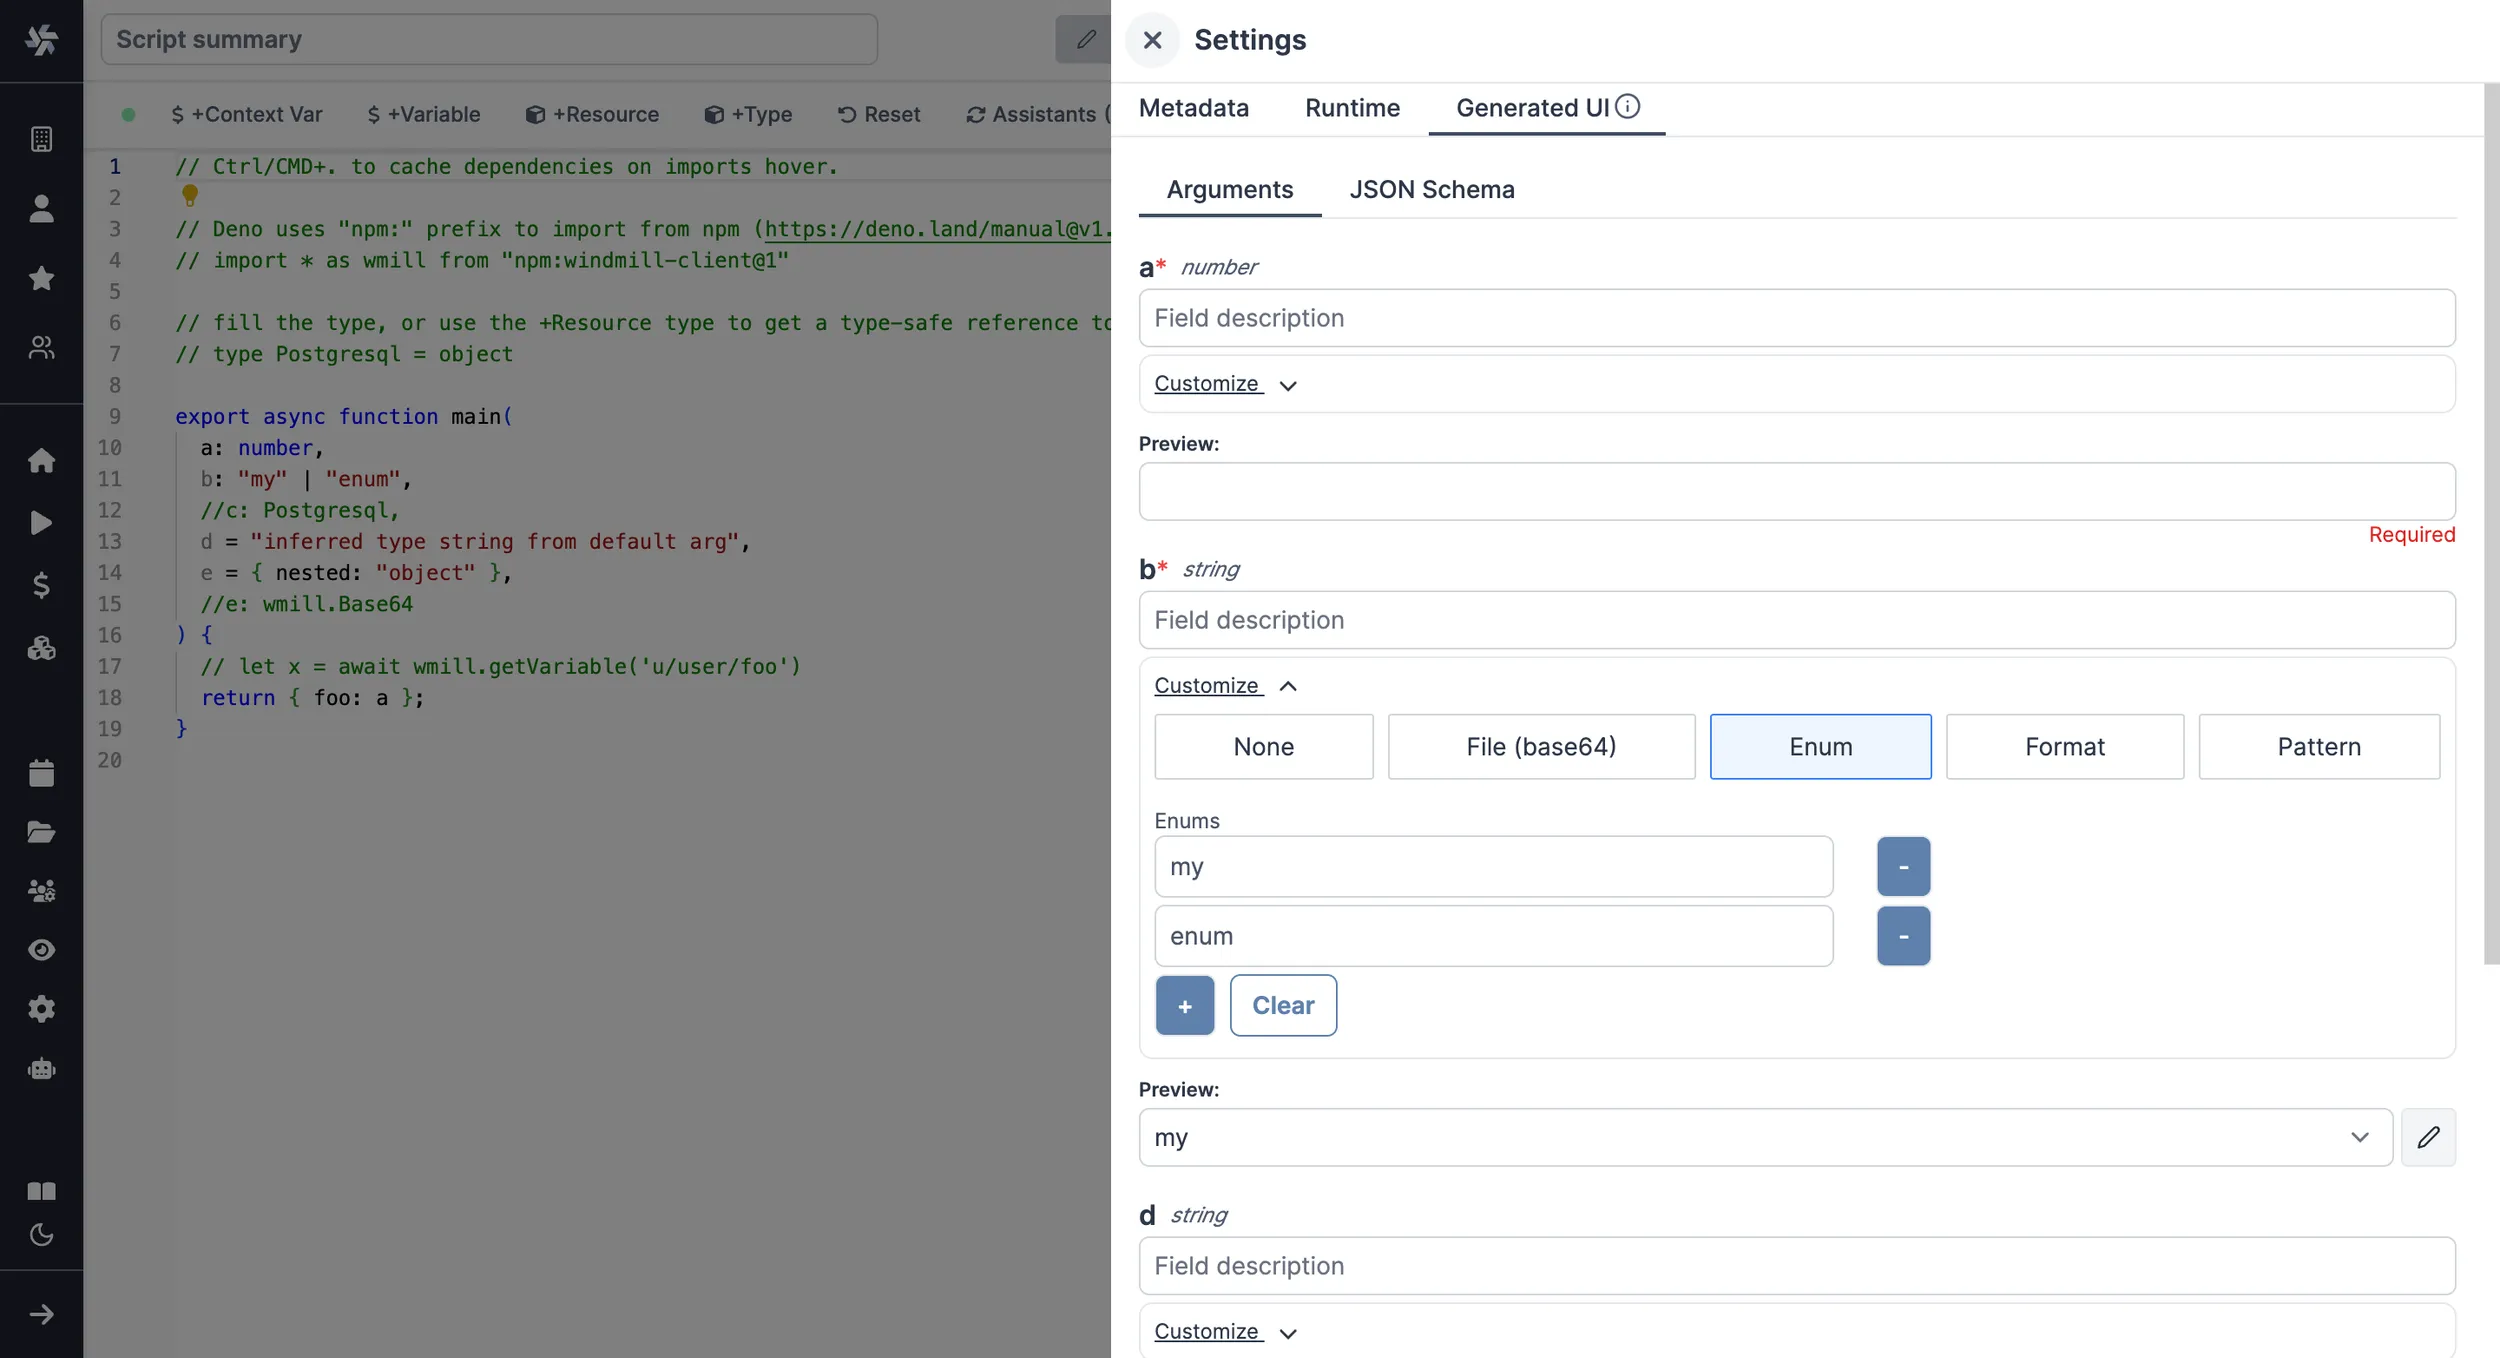
Now let's go to the last step: the "Generated UI" settings.
Generated UI
From the Settings menu, the "Generated UI" tab lets you customize the script's arguments.
The UI is generated from the Script's main function signature, but you can add additional constraints here. For example, we could use the Customize property: add a regex by clicking on Pattern to make sure users are providing a name with only alphanumeric characters: ^[A-Za-z0-9]+$. Let's still allow numbers in case you are some tech billionaire's kid.
Workflows as code
One way to write distributed programs that execute distinct jobs is to use flows that chain scripts together.
Another approach is to write a program that defines the jobs and their dependencies, and then execute that program directly in your script. This is known as workflows as code.

All details at:
Run!
We're done! Now let's look at what users of the script will do. Click on the Deploy button to load the script. You'll see the user input form we defined earlier.
Note that Scripts are versioned in Windmill, and each script version is uniquely identified by a hash.
Fill in the input field, then hit "Run". You should see a run view, as well as your logs. All script runs are also available in the Runs menu on the left.
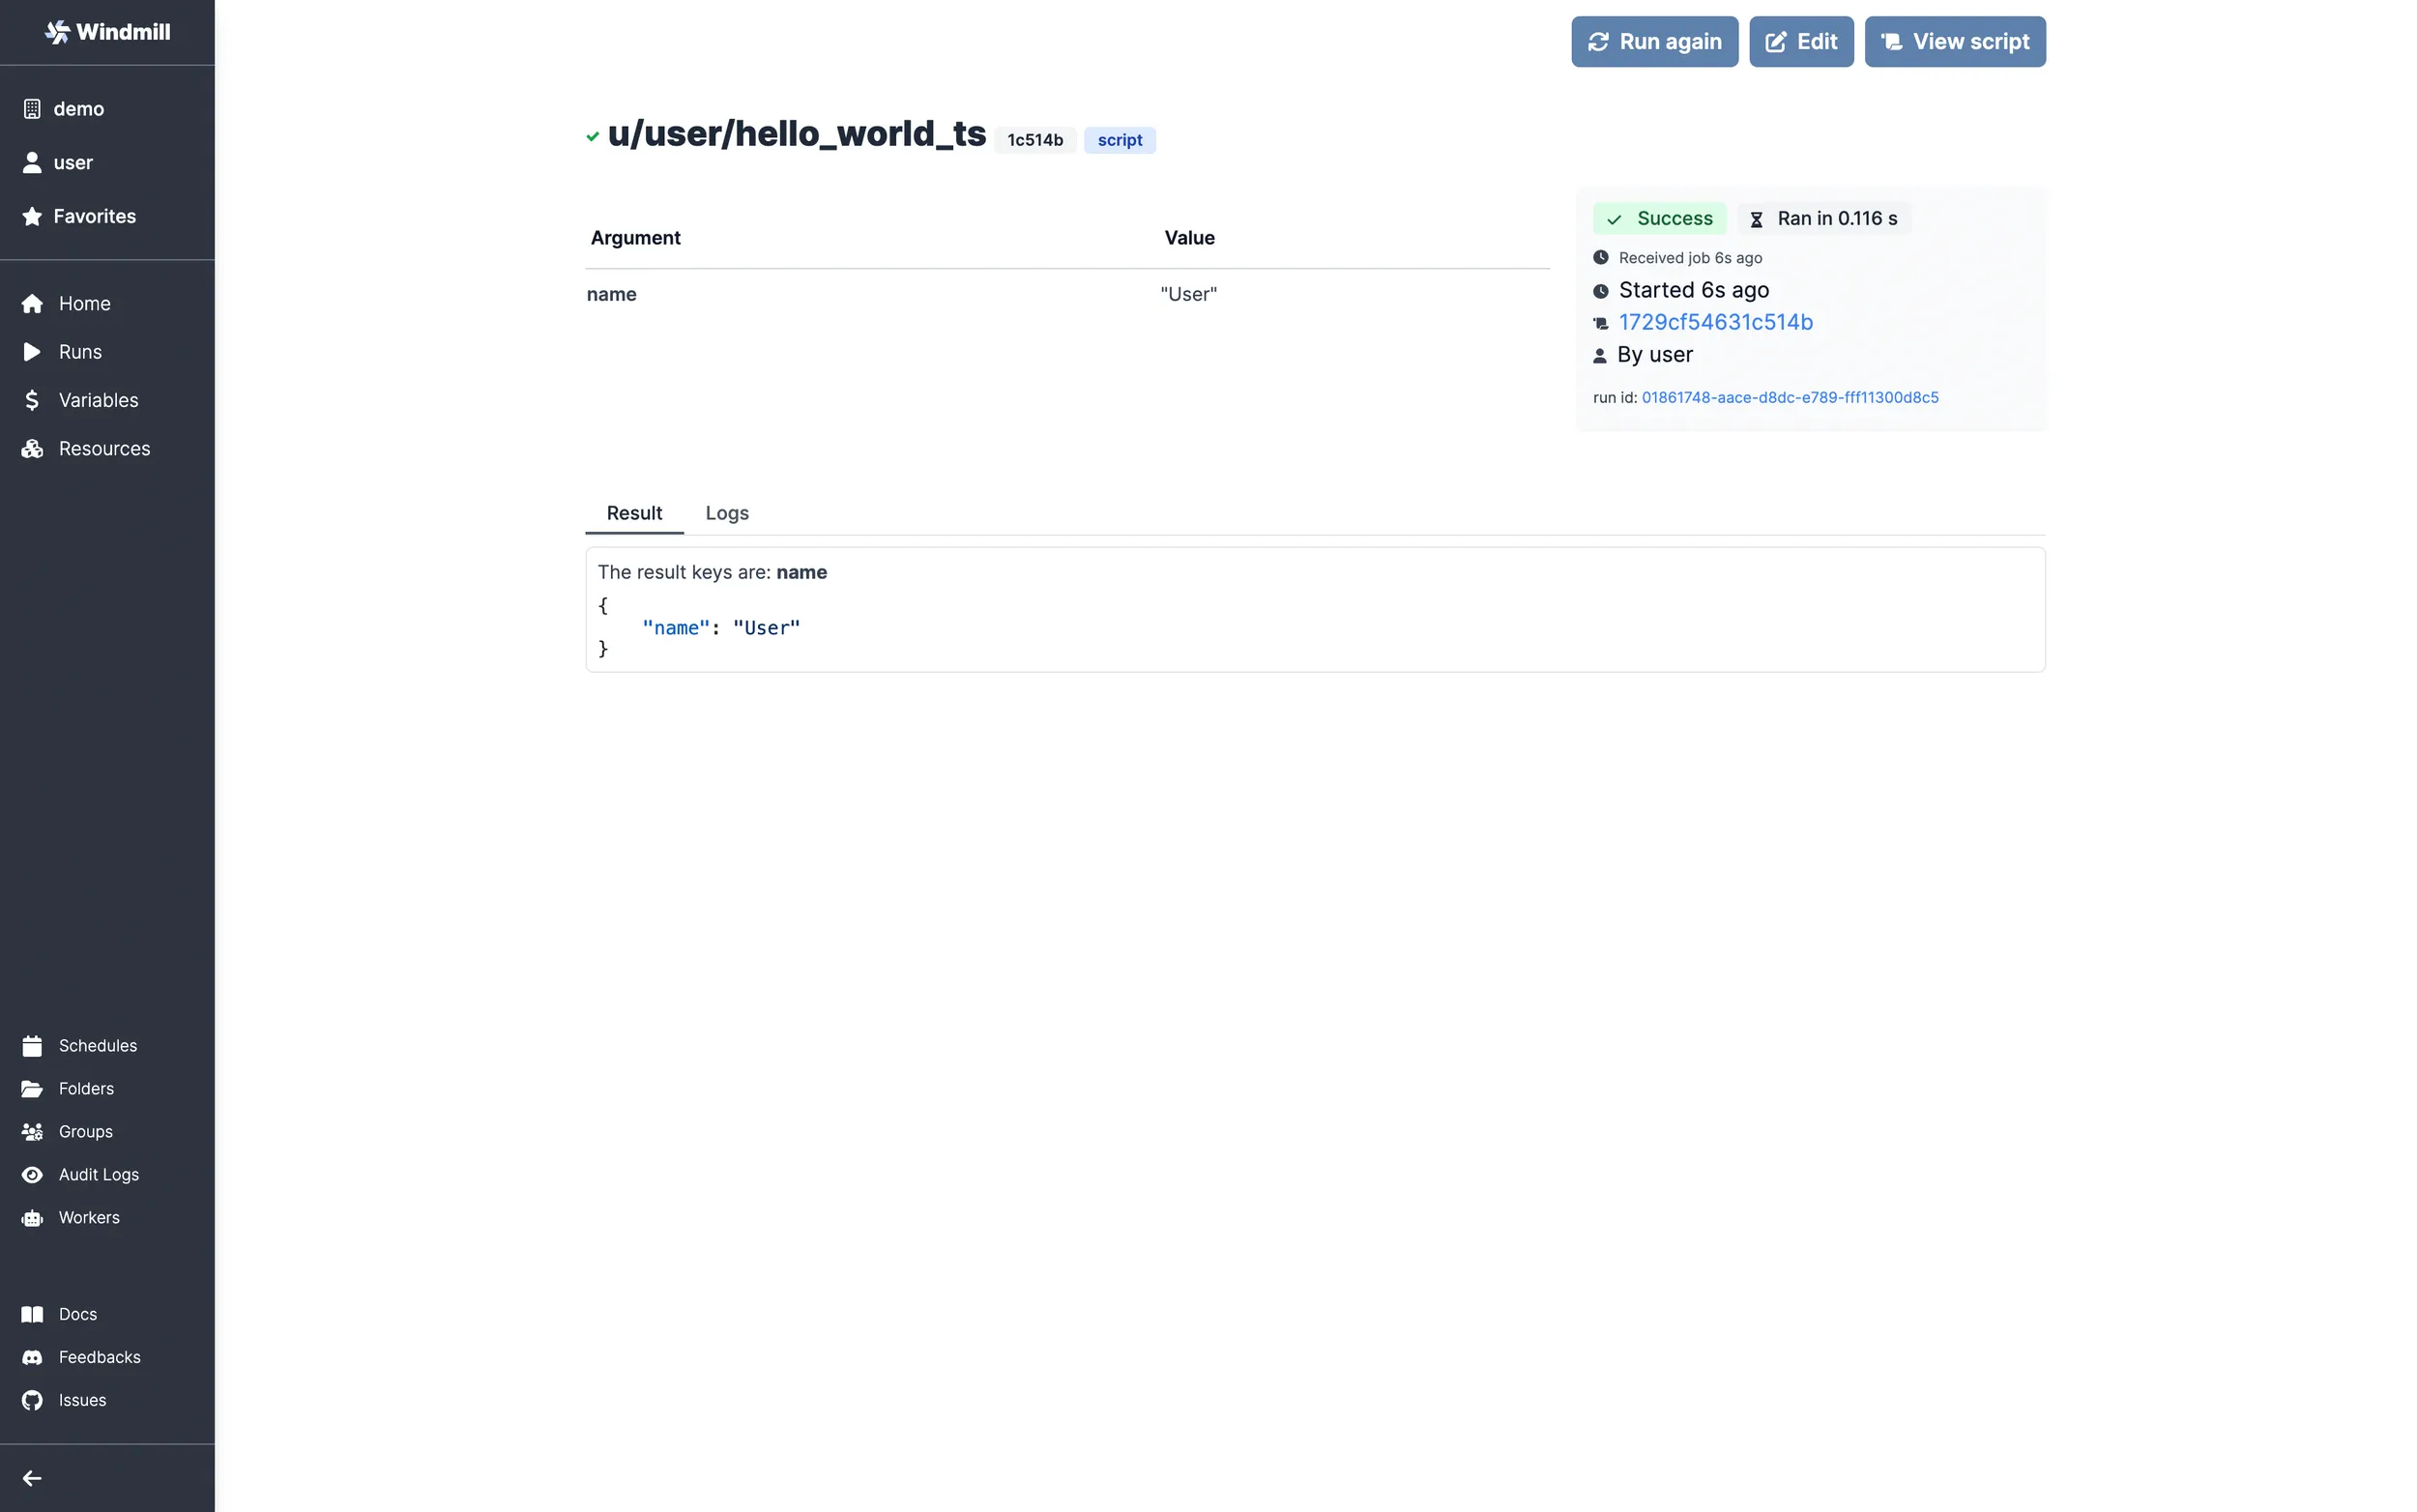
You can also choose to run the script from the CLI with the pre-made Command-line interface call.
Caching
Every bundle on Bun is cached on disk by default. Furtherfore if you use the Distributed cache storage, it will be available to every other worker, allowing fast startup for every worker.
What's next?
This script is a minimal working example, but there's a few more steps that can be useful in a real-world use case:
- Pass variables and secrets to a script.
- Connect to resources.
- Trigger that script in many ways.
- Compose scripts in Flows or Apps.
- You can share your scripts with the community on Windmill Hub. Once submitted, they will be verified by moderators before becoming available to everyone right within Windmill.
Scripts are immutable and there is an hash for each deployment of a given script. Scripts are never overwritten and referring to a script by path is referring to the latest deployed hash at that path.
For each script, a UI is autogenerated from the jsonchema inferred from the script signature, and can be customized further as standalone or embedded into rich UIs using the App builder.
In addition to the UI, sync and async webhooks are generated for each deployment.